When it comes to Pardot forms and email preference centers, there can be a lot to customize. Some of these items are easy to figure out, but there are some lesser known ways to customize some of these features as well.
1. The Resubscribe Button
When a prospect unsubscribes from one of your emails, Pardot will give them the option to resubscribe to your email communications, but did you know that with some basic javascript you are able to customize the resubscribe button text? If you aren’t code-savvy, no worries! The steps are easy to follow and the javascript I include below can be copy/pasted directly into your layout template.

- Edit the Layout Template you’re using for your unsubscribe page.
- Copy the javascript (included below) and place it inside the Layout Template’s <head> tag.
- Replace “YOUR TRANSLATED TEXT” with the message that you’d like to display on the button.
- That’s it, you’re done!
Code to customize the ‘Resubscribe’ text
<script type=”text/javascript” src=”/js/jquery/jquery.min.js”></script><script type=”text/javascript”>
$(document).ready(function(){
var span = $(‘form.form p.submit’);
span.html(span.html().replace(“Re-subscribe”,”YOUR TRANSLATED TEXT”));
});
</script>
2. Customize the ‘Not You?’ text on your Pardot forms
Recently I had a client who was trying to translate some of their Pardot forms from English to German, as they were getting ready to launch a German-based website. All was well and good until they got to the ‘Not You?’ text on their forms. Everything else on the form was able to be translated, but they ran into a bump here. Of course, the ‘Not You?’ piece of the form is minor and some customers choose to not include it at all, but it’s good to know that this text can also be modified with some templated javascript.

- Edit the Layout Template that is being used for the form
- Copy the javascript that I’ll include below and place it in the Layout Template’s <head> tag
- Replace “UPDATE1” and “UPDATE2” with your desired language.
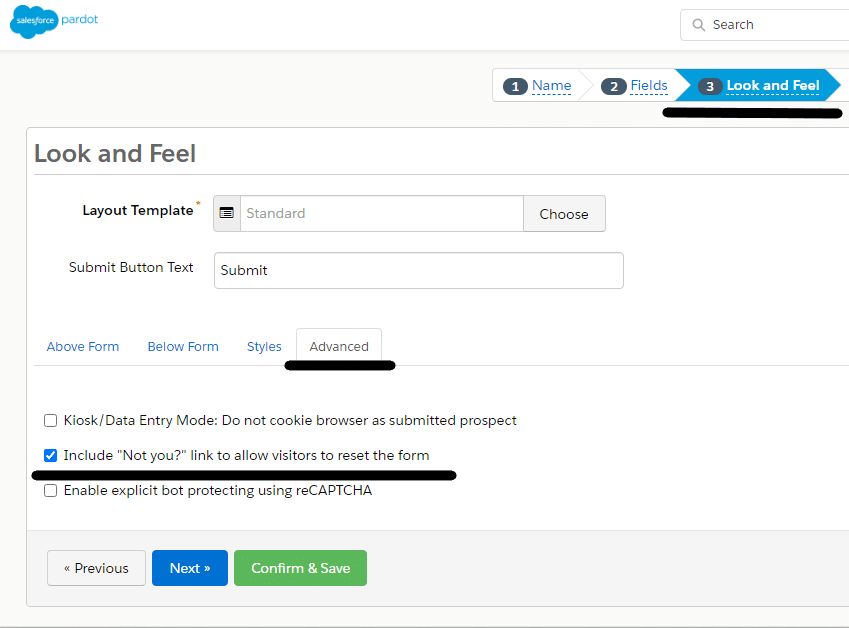
- That’s it! Just don’t forget that the option to include a ‘Not You?’ link is disabled by default. To enable this feature:
- Edit your form
- Jump to step 3 of the wizard, ‘Look and Feel’
- Click the ‘Advanced’ tab
- Check the box to include a ‘Not You?’ link

Code to customize the ‘Not You?’ text
<script type=”text/javascript” src=”/js/jquery/jquery.min.js”></script>
<script type=”text/javascript”>
$(document).ready(function(){
var span = $(‘.email span.description’).first();
span.html(span.html().replace(“Not”,”UPDATE1″));
span.html(span.html().replace(“Click Here”,”UPDATE2″));
});
</script>
3. Edit the Error Message on Your Pardot Form Fields
The last thing I’ll cover in this article is how to go about changing the error message your Pardot form fields give when someone enters in information incorrectly. These messages could be triggered by something like trying to enter a personal email address on a form that only allows business email addresses, or forgetting to fill out a required field.
Here are the steps to follow:
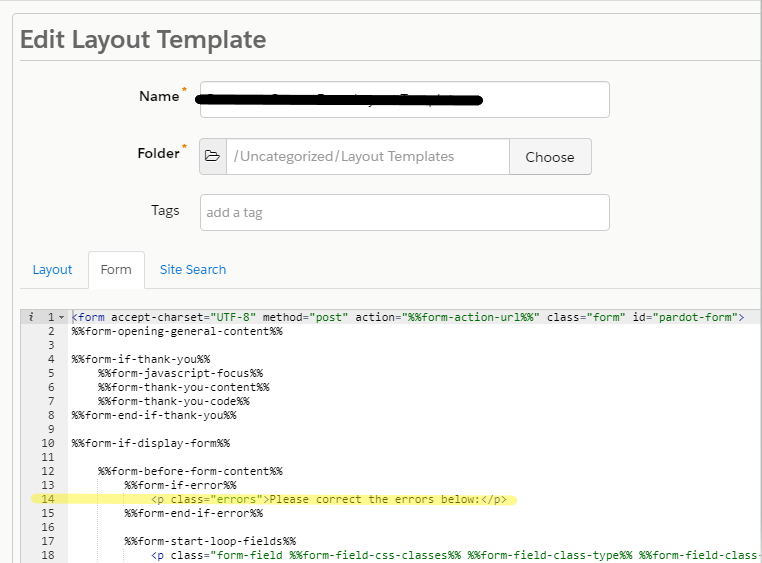
- Edit the layout template of the form
- Click on the ‘Form’ tab
- Updated the highlighted portion of the screenshot with your selected text

Hopefully you find these tips useful in your everyday life as a Pardot Admin. If you’re looking for more tips and tricks, support, or marketing automation strategy, let the Pardot consultants at Invado Solutions know!


