You may have noticed some strange activity when viewing some of your email reports, or even when just viewing a prospect’s activity history. Email security and enhanced spam filters are becoming more and more common. Certain services out there will actually click every link in an inbound email to make sure none of the links are malicious. While the intent is good, it can definitely skew your email reporting in Pardot and Salesforce.

Notice the timestamps on those link clicks. There is an incredibly small chance that the prospect clicked all of the links in the email within a minute, whereas that is the exact type of thing a security scanner would do.
Visitor Filters
Visitor filters allow you to filter out bot activity from your emails. In your Pardot instance, navigate to Admin > Automation Settings > Visitor Filters to see for yourself. Pardot currently has 33 different visitor filters with a good chunk of those having been added within the last year or two. These are meant to catch the more common bots out there that are clicking through your emails. While they aren’t perfect and don’t catch everything, you may be surprised at what they do catch.
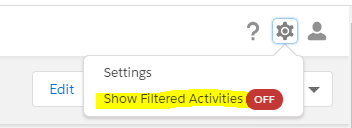
In the top right of your Pardot instance, click the gear icon and select “Show Filtered Activities” to toggle it on, if it isn’t already on. This will allow you to see activities on the prospect record that Pardot has filtered out.

Once this has been toggled on, I can navigate back to the same prospect record from the screenshot above and now this is what I see.

You are now able to see which clicks were filtered out from your Pardot reports, which could help to explain some discrepancies you may have noticed in the past.
Another example of using visitor filters is for your own employees. A lot of companies choose to include a seed list of internal employees when starting a new email campaign. Those employees will probably click through the email, which is great, but will also skew your reporting. To combat this issue, just create a visitor filter based on your company’s IP or hostname. You can do this by navigating to Admin > Automation Settings > Visitor Filters, select ‘Add Filter’, and enter in the IP or hostname. There are a few things to watch out for when setting up visitor filters for your own employees that I’ll go into in the next section.
Thing to Consider
There are a few things to watch out for when visitor filters are active. Once it goes into effect, it will only work on new visitors. It will not work on prospects that were already tied to an IP address prior to the filter being created.
Another important thing to look out for in regards to setting up a visitor filter for your own employees has to do with completion actions and Pardot scoring. If your employee is included in a visitor filter, they will not get autoresponder emails, form notifications, or email completion actions as well as not being scored for their activities. This could make testing a bit of a challenge, but sending emails to your smartphone while it is not connected to the company wifi should be a solid workaround. Be careful here, because if you’re not aware of these implications visitor filters have, you could be stuck troubleshooting an issue you shouldn’t have to.
Lastly, once a visitor filter is implemented (for your internal employees) they must clear all of their Pardot cookies for the filter to take effect. This ties back to the first point I told you to watch out for in this section.
There are a lot of things to watch out for with visitor filters alone, let alone all of the other areas of Pardot email marketing. If you need more Pardot tips or help with setting up Pardot, let the Pardot consultants at Invado Solutions help!


