
There are a number of problems which we see over and over again in the Pardot community. The good news is they often have a fairly simple solution. This series of blog posts will cover the most common Pardot support questions, and detail common solutions.
One of the most common questions in the Pardot Community is about how you make data appear in new custom fields in Pardot.
It is phrased a couple of different ways:
- “I made a new field in Salesforce, and made the matching field in Pardot, but Pardot did not pull in the data and the fields are empty in Pardot.”
- “Pardot will only pull in the field values when I force a sync on the prospect record – there must be an easier way to do this.”
- “I made a Pardot Dynamic List based on a new field, but the list is much smaller than it should be. What is wrong?”
Don’t worry – Pardot is not broken. The system just doesn’t know that there is data in the field (yet).
Pardot does not pull in the field value automatically
Pardot is trying hard to keep all of your fields up to date. It syncs with Salesforce constantly. In fact, it creates ‘batches’ of prospects who need to sync with Salesforce, and syncs those prospect batches approximately every two minutes.
That sounds like Pardot should sync your entire database in a short amount of time, but actually the behavior is a bit different.
Pardot is keeping track of two things:
- The date when Pardot last synced with a record in Salesforce.
- The ‘Last Modified Date’ in both Salesforce and Pardot.
When the ‘Last Modified Date’ is newer than the date it last synced to Salesforce, Pardot will put that prospect into the queue to be synced.
The ‘problem’ is that creating a new field in Pardot does not cause a change to the ‘Last Modified Date’ in either system, so Pardot never knows that something new is available. It thinks that nothing has changed since it last synced to the Salesforce record.
You just need to prompt Pardot to perform a sync anyway, and the key to forcing a Pardot sync is what are called ‘syncing events.’
What are Syncing Events in Pardot?
In Pardot, Syncing Events are the activities which cause Pardot to sync with Salesforce. The activities could be taken by the prospect, by the user (you), or by the system (Pardot).
(List taken from this Salesforce article.)
- Prospect activities (actions taken by the prospect):
- Form submission
- Form handler submission
- Landing page submission
- Unsubscribe
- User actions (actions you can take):
- Prospect import
- Prospect field changes (including opting out prospects via import or manually)
- Pardot campaign changes
- Changes to assigned user
- Manually syncing from the prospect record
- System actions (actions taken by the Pardot system):
- Record changes that occur because of an automation rule or completion action
- Add to Salesforce campaign via automation rule, segmentation rule, completion action, or Engagement Program action
- Salesforce campaign status update via automation rule, segmentation rule, completion action, or Engagement Program action
In addition, you can ask Pardot Support to do an entire database sync. To do this, you can open a support ticket and they will generally reply within two or three business days to schedule the sync with you.
But the easiest way to force all prospects to sync is something you can do yourself in only a few minutes.
You can make Pardot pull the field value from Salesforce
The absolute easiest way to make Pardot pull the field value from Salesforce is to do an import into Pardot.
(You do not even need to ‘do’ anything with the prospect – you do not need to update the actual field value, you do not need to put them on a list. You are just going to import them.)
All you need is a CSV file with two columns:
- CRM ID
- Prospect email address
Save your CSV file to your computer, and in Pardot go to Admin > Import > Prospect. From here you will upload the file and follow the import wizard. Select the first radio button, which indicates you will use CRM ID as the unique identifier.
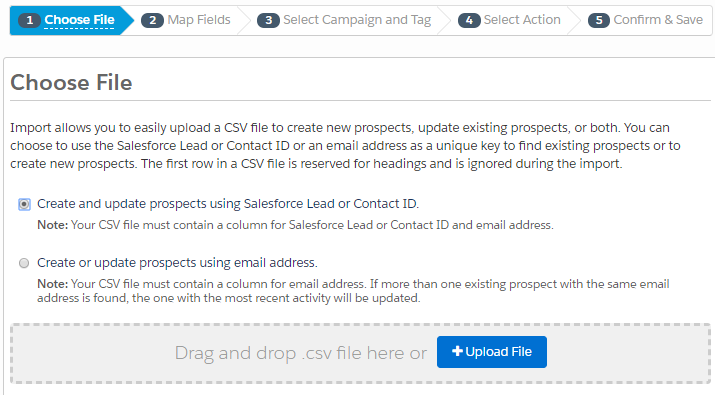
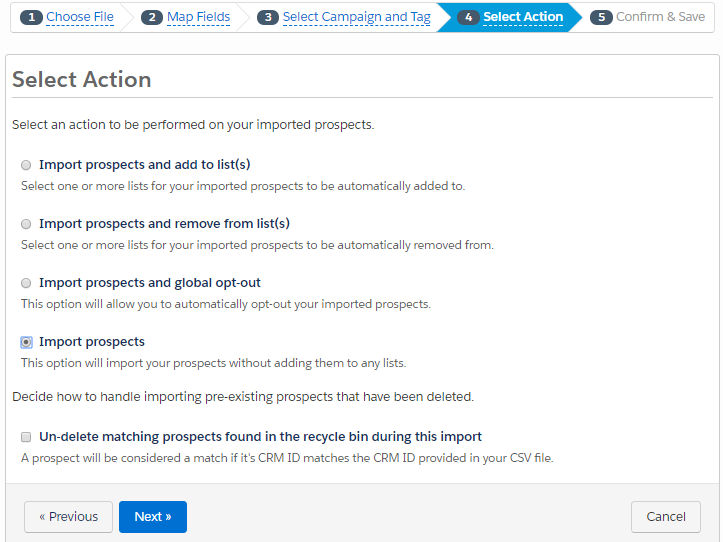
Tip: on Step 4 of the import wizard select the radio button to import – you do not need to add them to a list (but you can, if you wish).
When you complete the import your prospects will be added to your Sync Queue. Pardot will work its way through your Sync Queue, and when the prospect syncs, Pardot will see the new field has data in it and will pull the field value from Salesforce to populate the field for you.
You can monitor the count of prospects in the queue to see when they are all finished syncing.
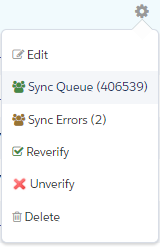
Find your Sync Queue under your Salesforce Connector. In Pardot, go to Admin > Connectors. Find your Salesforce Connector and click the gear/cog icon off to the right. A little menu will drop down:
This is what your Sync Queue might look like after performing an import – you can see there are many records remaining to sync.
Once all prospects have synced you can check your Pardot Dynamic List based on the custom field value, and the list should populate as expected.
Need help with Pardot? Contact us.