I remember when Salesforce introduced Lightning for Sales Cloud. We were all so accustomed to the Classic interface that even though Sales Cloud Lightning was clearly an improvement, many users were hesitant to embrace the new UI.
And now, with Pardot Lightning, “It’s like déjà vu all over again”. And yes, the navigation is different in Pardot Lightning, but it isn’t so different that you can’t figure it out! And if my many years of experience with Salesforce tell me anything, it is that all updates will be happening in the Lightning App and not in the standalone Pardot. For example, the Pardot development team has been busy making enhancements like Snippets which are only available in the Lightning App. Another improvement is the ability to right click (or Ctrl Click) on a prospect or a piece of content and have it open in a new tab. This was not working a couple of months ago and, as I was writing this, I tested it and now it works! Yay! for Salesforce Pardot!
It can be reassuring to be able to toggle between the two, but when you are ready for the advanced features that are available in Pardot Lightning only, you’ll be comfortable enough in Lightning to stay there.
One of the benefits of using the Pardot Lightning App is that you can edit the App to include the Salesforce objects that you work on the most. For example, if you work in a small- to medium-sized business, non-profit, or educational institution, you might be an accidental Salesforce admin who is also an accidental marketer. You might need to switch back and forth between Pardot and Salesforce all day. If that is the case, you can edit your Pardot Lightning App by adding the Navigation Items (tabs) that you frequently use, i.e. Leads, or Opportunities, so that everything you need is in one place.
You can add items to your App in a couple of different ways. If you want to make changes to your view only, select the pencil at the right, and the Edit Pardot App Navigation Items box will appear. Select the button that says, “Add More Items”, and then select the tabs you like.
To add new tabs for all users, go to setup/App Manager/Pardot. Select the down arrow to edit the Pardot App that has Lightning in the column for App Type.

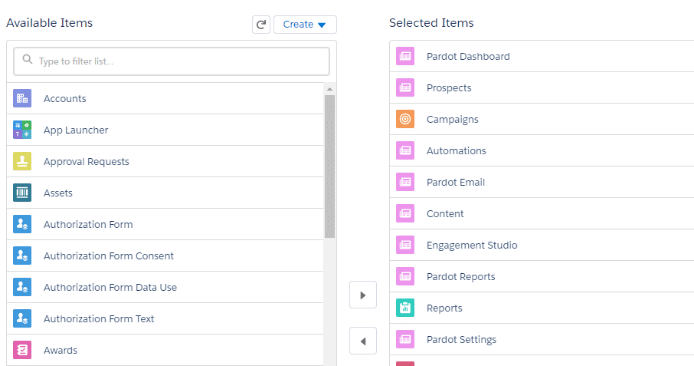
On the left side of the screen you will see App Settings, select Navigation Items to see a list of tabs and select the items you want to include in your Pardot Lightning App. Use the arrows in the center to add or remove items and use the arrows on the right side of the selected items to put them in the order that works best for you.

This is what your Pardot App might look like after you add your favorite tabs:

Editing the Navigation items on your Pardot App is great, but the converse is true too, you can add the Pardot Navigation items to any other App that you like. I created a new App called Marketing Admin and included the Pardot Navigation items I need to access every day.
There are two things that are not as intuitive as I would like in the Pardot Lightning App:
- Links to Pardot in system emails point to the standalone Pardot app, not the corresponding screen in the Lightning app.
- Some users will assume that the Pardot App is the Lightning App because they see this in the App picker, so be sure to follow the installation instructions and remove access to the Pardot Classic App.

If you are not a System Administrator in your Salesforce org, you may need to find one to help you enable the Pardot Lightning App. And if you want to know more about how to optimize your Pardot and Salesforce, or get more Pardot tips, contact your Pardot consultants at Invado Solutions.


